 24/7 Emergency Service
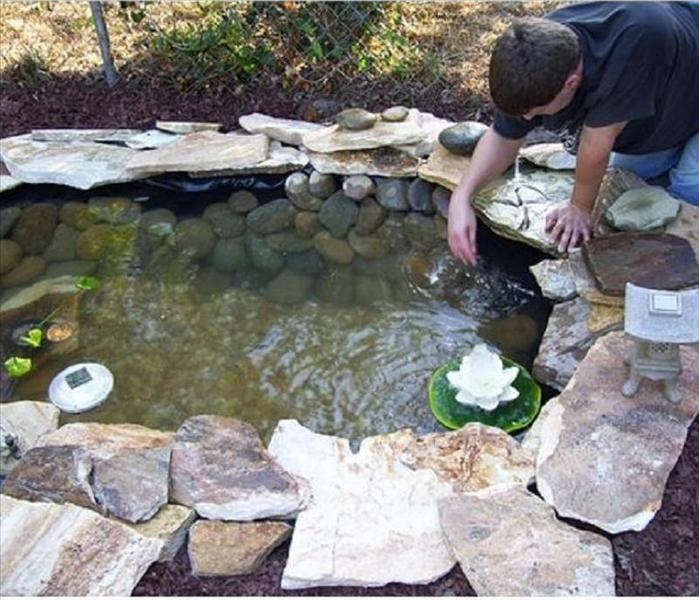
How to Build a Pond
6/25/2014 (Permalink)
How cool would it be to have a pond in your own yard? And even better, wouldn't you love for it to be cost efficient?! Here’s how to build your own pond, and tips on easy maintenance as well.
Step one- Rough out the area the size you want your pond. A pond can be as large as you wish, but I chose to make mine approximately 4×8 feet. Check with your local code if you plan to place the pond in an unfenced area…some towns limit the depth of the pond if it is unfenced, usually to 12 inches.
Decide if you just want a decorative pond, or a complete water garden with live plants and fish. I chose a decorative pond with a fountain feature, but keep in mind a water garden will require a deeper pond with more maintenance.
Step two- Once you have the pond shape marked with either paint, chalk or a spare hose laid out on the border, it’s time for the hard work! Dig! My original pond was 18 inches deep to allow for some goldfish my children wanted. Goldfish are tough as nails, but keeping up with the algae was tougher! When doing some repairs the following spring, I removed the fish and backfilled my pond until it was only 12 inches deep. Whatever you choose, excavate the pond to the desired depth and try to keep the sides as vertical as possible. This will make it easier to hide the liner later.
Lay some material in the bottom of the pond to cushion the liner against rocks, sticks and other items likely to punch holes. Good low budget ideas are newspaper, old carpet or even sand.
Step three- Purchase a pond liner from your local supplier or discount store. Measure your pond depth x 2 and add to the length plus 2 feet- that is the length of your liner. Your pond depth x 2 added to the width plus 2 feet- that is the width of your liner. The extra 2 feet allows for fitting and cutting away of the excess.
Lay the liner over the pond and fit into the bottom, fill halfway with water and allow to sit several hours or overnight to settle the soil. Trim the liner to hang just 3-4 inches over the lip of the pond…that few inches is important, better to trim too little than too much, you can always go back later and re-trim. If you are going to add a fountain pump, place it in the pond now.
Step four- Now you want to hide the edges of the pond liner with rocks. Flagstone in my part of the country is pretty expensive, so I figured out a way to get the flagstone look for only $25. I picked up a case of slate floor tiles, and used a hammer to break them into pieces. I lay the slate over the lip of the pond with the broken side facing the pond center. I then hid any smooth edges of the tiles with river rocks from my yard, simply layered on top of the slate. You can also use the local rocks to hide any excess pond liner as well. Plug in your fountain pump, and set it onto a brick to achieve the right height if necessary. Make sure you have a GFI outlet to plug into, if not, consider a solar pump.
Step five- Add plants and accessories around the pond to make it a welcoming place for all your visitors! Be sure there is seating nearby, and a birdfeeder in the nearby trees will ensure a steady supply of feathered friends to enjoy your pond oasis!
There are many algae controls available for those not interested in learning the complexities of creating a natural biological environment in their water garden. Even discount stores carry such supplies the garden section. A small amount of bleach will also keep the water clean, though you must be careful to use small amounts, and avoid this method if wildlife frequents your pond.
This is fast, easy and a showstopper that will add real value to your garden and your home.
Blog Credit: How to Build a Pond